Getting Started
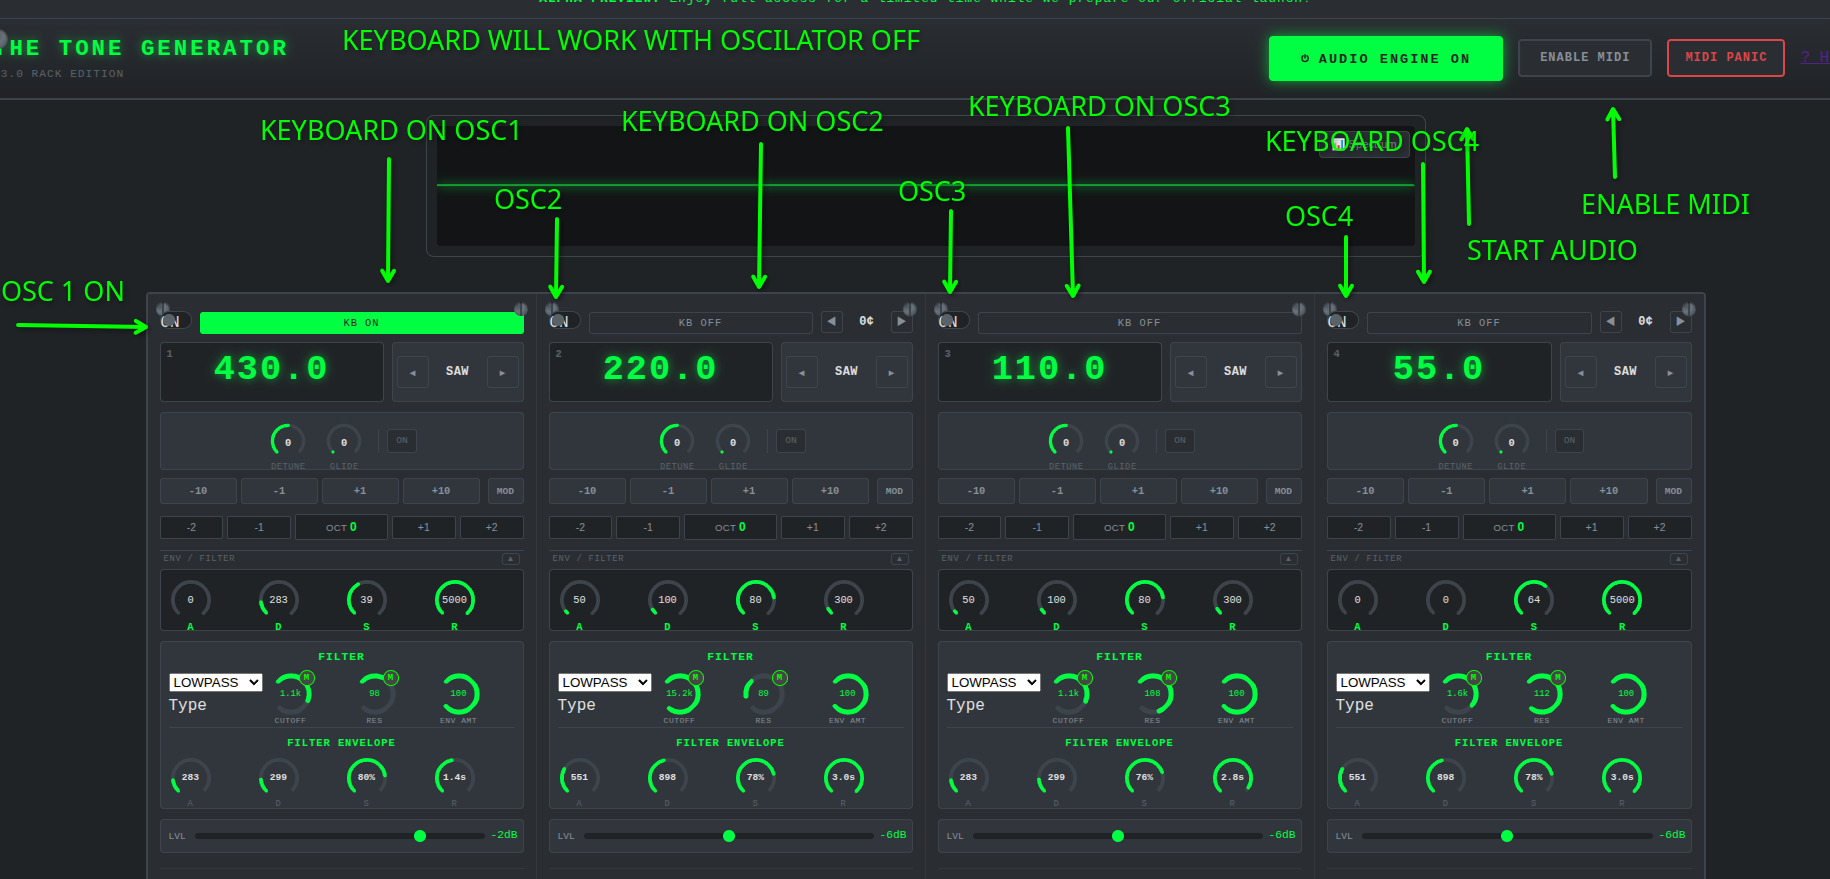
- Click START AUDIO ENGINE at the top
- Enable oscillators by clicking their power buttons
- Select waveforms (SINE, SAW, SQR, etc.)
- Adjust frequencies or play notes via MIDI/keyboard
- Use the mixer to balance levels
Oscillators (4 Channels)
Each oscillator is an independent sound source with its own waveform, pitch, and effects.
Waveforms
| Waveform | Description |
|---|---|
| SINE | Pure tone, no harmonics |
| SAW | Bright, buzzy, full of harmonics |
| SQR | Hollow, reedy, 50% duty cycle |
| PULSE | Like Square but starts at 25% duty width — thinner, more nasal. Adjust width with the Pulse Width knob. |
| TRI | Soft, flute-like |
| NOISE | White/pink noise |
| BINAURAL | Brainwave entrainment tones |
| FM | Frequency modulation synthesis |
| GRANULAR | Granular synthesis |
| SHEPARD | Infinite rising tone illusion |
| BOWL | Singing bowl simulation |
Header Controls
| Control | What it does |
|---|---|
| ON (power button) | Turns the oscillator on/off — disables audio output but KB control still works |
| KB ON / KB OFF | Enables keyboard/MIDI note control for that oscillator. Each oscillator has its own KB button — toggle them independently to choose which oscillators respond to your keyboard or MIDI controller |
| COPY | Copy all settings from another channel into this one — frequency, waveform, octave, semitone, envelope, filter, and full effect chain |
Per-Oscillator Controls
- Frequency Display: Click and drag to change pitch
- Hold Buttons (-10, -1, +1, +10): Fine/coarse frequency adjustments
- Octave Shift: Shift pitch by octaves (-2 to +2). The OCT button shows the current shift.
- Semitone Shift: Transpose by individual semitones (-12 to +12). The SEMI button shows the current shift. Use alongside Octave Shift — they combine.
- Detune: Fine pitch adjustment in cents
- Glide: Portamento between notes
Filters & Envelopes
Filter Types
- Lowpass: Allows lows, cuts highs
- Ladder: Moog-style 4-pole lowpass. Richer resonance than the standard lowpass — push Resonance past 80% to reach self-oscillation. This is the default for channels that previously used HP or BP.
Amplitude Envelope (ADSR)
| Parameter | Function |
|---|---|
| Attack | Time to reach full volume |
| Decay | Time to fall to sustain level |
| Sustain | Volume level while note is held |
| Release | Time to fade out after note off |
Filter Envelope
Modulates filter cutoff over time using the same ADSR stages. The Env Amount controls how much the envelope affects the filter.
Effects Chain
Each oscillator has 3 effect slots. Effects are processed in series (top to bottom).
Available Effects
| Effect | Description |
|---|---|
| Reverb | Algorithmic room simulation |
| Conv Reverb | Convolution reverb with 5 programmatic impulse responses: Room, Hall, Plate, Spring, Cathedral. Knobs: ROOM (0–4), DECAY (sec), PRE-DELAY, DAMP (bright to dark), Mix. Room type and Decay rebuild the IR when changed. |
| Pro-R Reverb | Higher quality algorithmic reverb |
| Delay | Echo effect with feedback |
| Delay T3 | Alternative delay with different character |
| Ping Pong | Stereo delay bouncing left/right |
| Chorus | Thickening/chorusing |
| Flanger | Sweeping comb filter |
| Phaser | Phase shifting effect |
| Vibrato | Pitch modulation |
| Auto-Pan | Automatic stereo panning |
| Distortion | Overdrive/saturation |
| Bit Crusher | Lo-fi digital degradation |
| Wave Folder | Waveshaping distortion |
| Harmonic Exciter | Adds upper harmonics for air and presence |
| Gater | Uniform rhythmic gating — all steps identical. Rate and Shape knobs control timing and gate width. |
| Stutter Sequencer | Programmable 8-step gate pattern — each step independently on or off. Dial in syncopated chop rhythms. Steps (S1–S8), Rate (1/4–1/16), Steps (4 or 8), Shape (sharp to soft transition). |
| Filter Sequencer | 8-step filter cutoff sequencer synced to BPM. Each step (S1–S8) sets a cutoff level. Rate, step count, resonance, and mix knobs. |
| Resonant Filter | Static resonant lowpass filter |
| Formant Filter | Vowel-shaping filter |
| Sub Octave | Adds a sub-octave voice |
| Ring Mod | Multiplies the signal by an internal carrier oscillator. Produces metallic, bell-like sidebands. Carrier Frequency sets the pitch of the modulator; Mix blends dry/wet. |
| AM | Amplitude modulation |
| Compressor | Dynamic range compression |
| 3-Band EQ | Low / mid / high shelf EQ |
| Widener | Stereo width enhancement |
| Comb Filter | Metallic resonant comb effect |
| Pitch Shifter | Changes pitch without duration |
| Echo Out | Output echo send |
LFO Modulation
5 LFOs (Low Frequency Oscillators) can modulate effect parameters, filters, and oscillator pitch/volume automatically.
LFO Parameters
| Parameter | Description |
|---|---|
| Rate | How fast the LFO cycles (Hz) |
| Depth | How much the LFO modulates its targets (0–100%) |
| Wave | Shape of the modulation — see below |
| Slew | Smooths the LFO output. At 0% the signal is raw/instant. Turn it up and sharp edges (especially on S+H) glide instead of stepping. Essentially a lag/slew limiter on the CV output. |
LFO Waveforms
| Waveform | Character |
|---|---|
| Sine | Smooth, rounded modulation |
| Triangle | Linear ramp up and down |
| Sawtooth | Rises slowly, drops instantly |
| Square | Snaps between two values |
| Pulse | Narrow square — brief on-time |
| S+H | Sample & Hold — picks a new random value each cycle and holds it until the next. Classic for random arpeggios or generative filter sweeps. Combine with Slew to turn the staircase into gliding curves. |
Assigning LFOs via MOD Button
- Set up an LFO (rate, depth, waveform)
- Click MOD on any effect parameter or filter knob
- Select which LFO to assign
Patch Cables
A visual modular routing system — click jacks to draw cables between sources and destinations.
How to Patch
- Click a source jack (LFO OUT, or an oscillator OUT jack)
- Click a destination jack (channel pitch, volume, filter, or another LFO's rate/depth)
- A colored cable appears connecting them
- Double-click either end to remove the cable
Available Sources
| Jack | Signal |
|---|---|
| LFO OUT | LFO CV — routes to any destination below |
| OSC OUT | Audio-rate signal from an oscillator — use for FM or AM cross-modulation |
Available Destinations
| Jack | What it modulates |
|---|---|
| Channel Pitch IN | Oscillator frequency (vibrato, random pitch, FM) |
| Channel Vol IN | Oscillator volume (tremolo, AM) |
| Channel Filter IN | Filter cutoff (filter wobble, generative sweeps) |
| LFO Rate IN | Another LFO's rate (LFO-to-LFO modulation) |
| LFO Depth IN | Another LFO's depth |
MIDI Control
MIDI Features
- Full MIDI controller support
- Auto-detection of Novation SL MkII
- MIDI Learn for any parameter
- External MIDI clock sync
- Pitch bend and mod wheel
MIDI Learn
- Click LEARN on a parameter
- Move a control on your MIDI device
- Mapping is saved automatically
Keyboard Split
Split your MIDI keyboard between oscillators:
- Lower half (below split note) → OSC 1 & 2
- Upper half (above split note) → OSC 3 & 4
- Enable per-oscillator KB buttons to control which respond
Chord Mode
Found in the Virtual Keyboard panel header (open with the 🎹 button). When enabled, a single MIDI note or keyboard key triggers all KB-active oscillators simultaneously as a chord voicing:
| Chord Type | Intervals (semitones from root) |
|---|---|
| Major | Root, +4, +7, +12 |
| Minor | Root, +3, +7, +12 |
| 5th | Root, +7, +12, +19 |
| Octave | Root, +12, +24, +36 |
| Sus2 | Root, +2, +7, +12 |
Each active oscillator gets one interval — so with 3 KB-active oscillators and Major selected, you get root + major third + fifth. Toggle CHORD ON/OFF to switch between chord mode and normal split routing.
Drum Sequencer
32-step drum machine with 9 drum sounds.
Drum Sounds
Kick, Snare, Hi-Hat, Clap, Sub, Rim, Tom, Cymbal, 808
Controls
- Play/Stop: Start or stop playback
- BPM: Set tempo (5-180 BPM) — use the -1/+1 nudge buttons for fine adjustment, or the TAP button (see below)
- TAP: Tap this button in rhythm to set BPM by feel. After 2 taps it starts averaging your tap intervals. Resets after 2.5 seconds of inactivity. The BPM set here applies to all BPM-synced effects (Gater, Filter Sequencer, Stutter Sequencer).
- Swing: Add shuffle feel (0-100%)
- Steps: 16 or 32 step patterns
- Pattern Banks: 5 banks for different patterns
- Hold to Copy: Hold a bank button to copy patterns
Step Editing
- Click a step to toggle it on/off
- Active steps are colored
- Current playback position is highlighted
Drum Roll (Piano Roll for Drums)
A canvas-based drum editor where you draw note lengths instead of toggling steps. Click ROLL in the sequencer toolbar to switch between the step grid and the drum roll.
Drawing Notes
| Action | Result |
|---|---|
| Click on empty space | Place a note — drag right to set length while placing |
| Click on existing note | Drag right edge to resize |
| Right-click note | Delete it |
Controls
- Snap: Grid resolution — 1/4, 1/8, 1/16, 1/32. Notes snap to this division.
- Bars: Extend the roll by 1 or 2 bars at a time with the + buttons
- Default note length: New notes default to the length of the last note you placed
- CLEAR: The main rack CLEAR button clears the drum roll notes when the roll is visible
- BPM: The drum roll syncs to the same BPM as the step sequencer — change it in one place and both update
Rows (Drum Sounds)
Each row maps to the same sounds as the step sequencer: Kick, Snare, Hi-Hat, Clap, Sub, Rim, Tom, Cymbal, 808.
Melody Sequencer (Piano Roll)
FL Studio-style piano roll for melodic patterns. Plays through the oscillator voices in real time — the notes you draw trigger the same synth engine as your keyboard.
Drawing Notes (Desktop)
| Action | Result |
|---|---|
| Left Click on grid | Add note |
| Drag note | Move note (pitch/time) |
| Drag right edge | Resize note |
| Right Click note | Delete |
| Alt + Drag note | Adjust velocity |
Drawing Notes (Mobile / Touch)
| Action | Result |
|---|---|
| Tap on grid | Add or remove note |
| Swipe (any direction) | Scroll the grid — no note is placed |
Toolbar
| Button | Function |
|---|---|
| ▶ / ⏹ | Play / Stop the pattern |
| 🔁 | Toggle loop mode |
| ⊞ Snap | Snap notes to grid divisions |
| Grid select | Grid size: 1/4 down to 1/64 |
| Q Quantize | Snap all notes to grid |
| +4 🎼 | Add 4 more bars to the pattern |
| BANK 1–5 | Five independent pattern slots — click to switch, hold to copy current into that slot |
| Voices | Choose which oscillators (1–4) the pattern plays through |
| − / + | Zoom the grid horizontally |
| 🗑 | Clear all notes |
Features
- Full chromatic range (C0–C8)
- Up to 16+ bars (add with +4 button)
- 5 pattern banks
- Grid snap (1/4 to 1/64)
- Quantize function
- Loop playback
- Polyphonic — up to 4 simultaneous voices
Loop Recorder
Records oscillator output into 8 reusable loop slots, each synced to BPM.
Recording
- Select a bar length (1, 2, 4, or 8 bars)
- Click REC to arm — the next empty slot is targeted
- Recording starts automatically on the next bar 1 boundary
- It stops automatically after the set number of bars, or click REC again to stop early
KB Only Mode
By default, the loop recorder captures all audio including the melody sequencer. Enable KB Only before recording to automatically stop the melody sequencer at the moment recording starts — so only your live keyboard playing is captured. The melody sequencer stays stopped after recording ends; restart it manually when needed.
Slot Controls
| Control | Function |
|---|---|
| Click slot | Toggle playback on/off |
| Volume slider (on slot) | Per-slot volume |
| ⏻ (fade button) | Fade out over ~2 seconds then stop |
| ✕ | Clear the slot |
Loop Arrangement Sequencer
A 16-bar timeline that sequences your loop slots into a song structure. Place blocks on the grid to control when each loop plays — leave gaps for silence. Multiple loops can play simultaneously.
The Grid
- Rows: Loop slots 1–8
- Columns: 16 bars
- Click an empty cell to place a block — it auto-spans based on that slot's recorded bar length (e.g. a 4-bar loop fills 4 columns)
- Click an existing block to remove it
- Empty cells = silence for that row at that bar
Playback Controls
| Button | Function |
|---|---|
| Play | Start the arrangement from bar 1 |
| Stop | Stop playback and silence all loops |
| Clear | Wipe the current scene's grid |
The green playhead moves left to right across the bar numbers. The bar counter shows the current position. After bar 16, it loops back to bar 1.
Scenes (A / B / C / D)
Four independent 16-bar arrangements — like song sections:
- Click a scene button to switch to it (saves the current scene first)
- Hold a scene button (~0.5 seconds) to save the current grid into that slot — the button flashes to confirm
- Scene buttons with saved data show a dim green border
Auto Advance
Enable Auto to automatically move to the next scene with content after each 16-bar pass. Cycles A→B→C→D→A, skipping empty scenes. Perfect for hands-free song playback.
Master Mixer
Channel Strips
- OSC 1-4: Individual oscillator levels
- Synth Master: Overall synth level
- Drums: Individual drum levels
- Drum Master: Overall drum level
- Loops: Recorded loop levels
Master Chain
- Compressor: Glue everything together
- EQ: Shape final tone
- Limiter: Prevent clipping
VU Meters
Show real-time levels and gain reduction from the master chain.
Mobile Use
The Rack Edition is fully usable on phones and tablets.
Section Navigation
A sticky nav bar appears at the bottom of the screen on mobile. Tap any label to jump directly to that section:
| Button | Jumps to |
|---|---|
| OSC | Oscillators |
| FX | Effects Chain |
| LFO | LFO Modulation |
| BEAT | Drum Sequencer |
| MELODY | Melody Sequencer |
| LOOP | Loop Recorder |
| MASTER | Master Output |
Piano Roll on Touch
- Tap a cell to place or remove a note
- Swipe in any direction to scroll the grid — no note is dropped
- Note resizing/dragging is a desktop-only feature
General Touch Tips
- Knobs respond to vertical drag — swipe up to increase, down to decrease
- Long-press knobs for a larger touch slider popup
- The virtual keyboard (🎹 button in Loop Recorder header) gives you a touch-friendly piano
Keyboard Shortcuts
Global
| Key | Action |
|---|---|
| Space | Play/Stop sequencer |
| Escape | Stop everything |
Piano Roll
| Key | Action |
|---|---|
| Delete / Backspace | Delete selected note |
| Alt + Drag | Adjust velocity |
Computer Keyboard (QWERTY)
Use your computer keyboard to play notes when Virtual Keyboard is enabled:
- Row 1 (Q-U): Black keys (C#, D#, F#, G#, A#)
- Row 2 (A-J): White keys (C, D, E, F, G, A, B)
- Row 3 (Z-M): Lower octave white keys
Troubleshooting
No Sound?
- Click START AUDIO ENGINE
- Enable at least one oscillator (power button)
- Check master volume and channel levels
- Make sure nothing is muted
MIDI Not Working?
- Click ENABLE MIDI
- Select your MIDI device from the dropdown
- On Linux, you may need to run:
aconnect [input] [output]
Notes Stuck / Pitch Drift?
Click MIDI PANIC to reset all notes and pitch bend.
High CPU Usage?
- Reduce number of active oscillators
- Disable unused effects
- Lower reverb/decay times
- Use simpler waveforms (Sine uses less CPU than Granular)
Chrome OOM Crash?
We've optimized memory usage, but if crashes occur:
- Close unused browser tabs
- Don't run for hours without stopping
- Clear browser cache if needed